利用 Github Pages 免費架一個靜態網頁
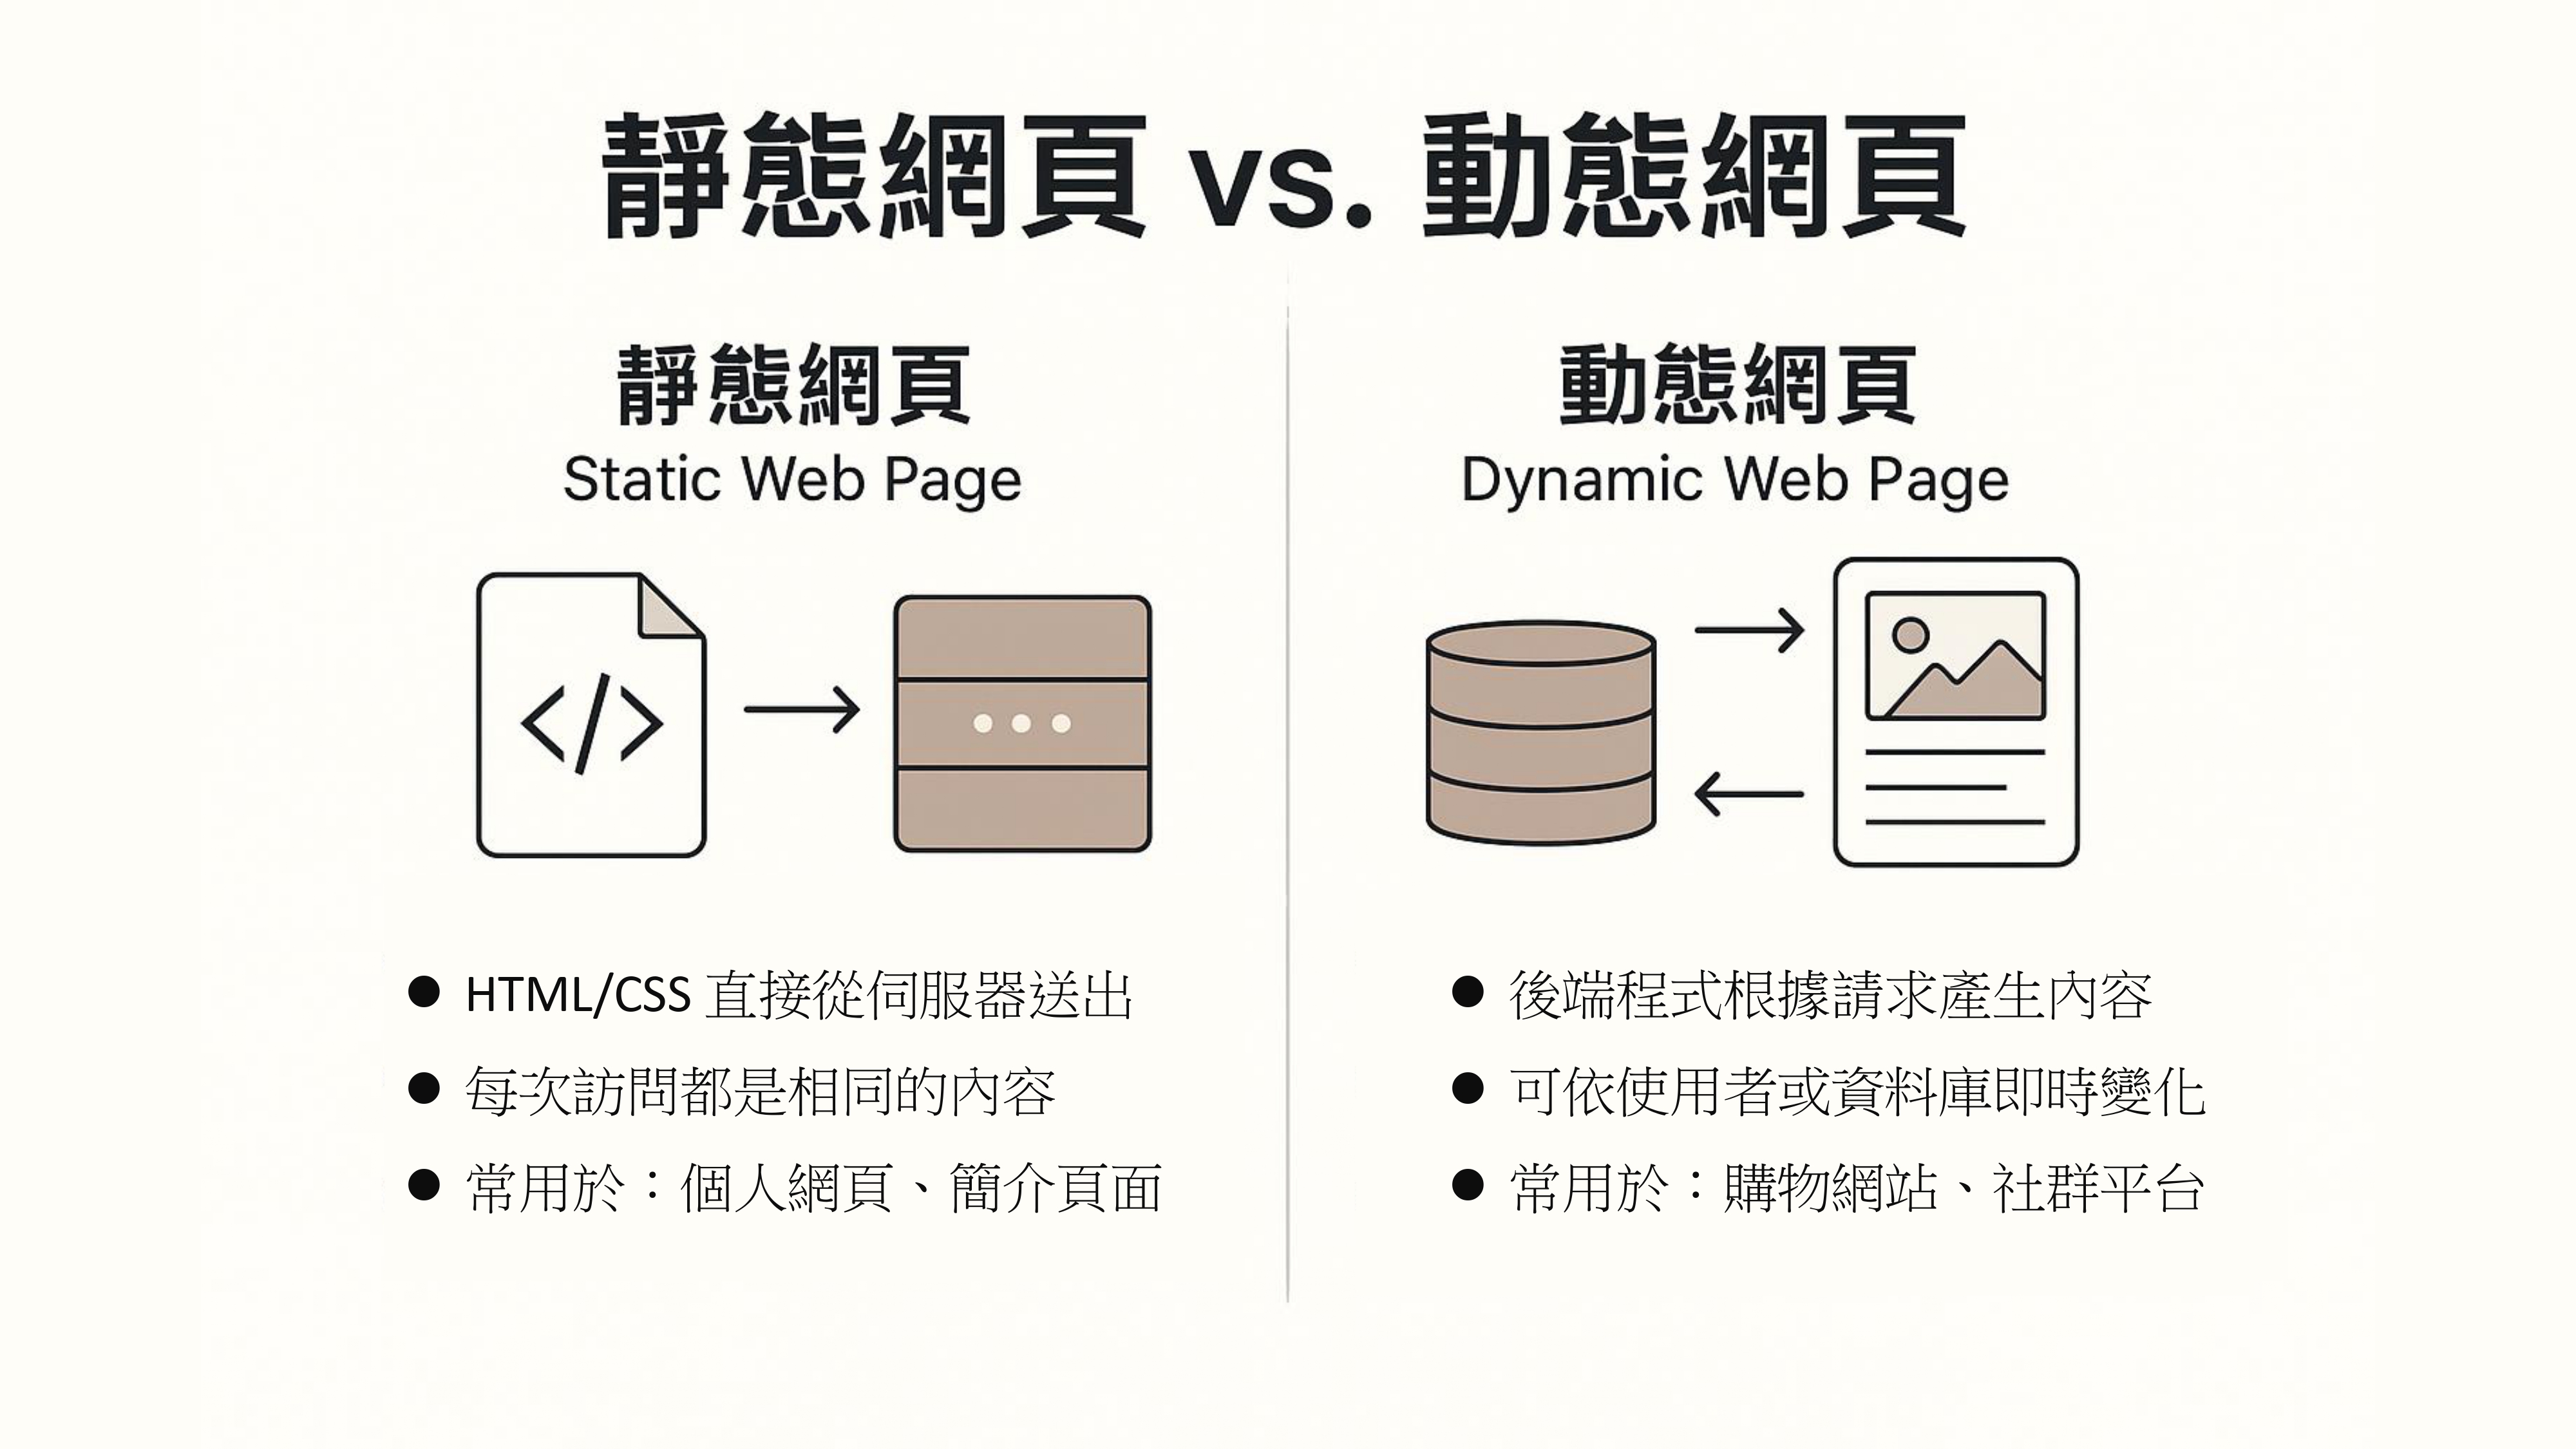
Step 0: 靜態網頁 vs. 動態網頁
Step 1: 設定自動同步 readme.md & index.md 腳本
這種方式可以 讓你只維護 README.md,然後在每次 Git commit 前,自動產生對應的 index.md 作為 GitHub Pages 的首頁,非常適合開發者使用的 workflow 🚀
✅ 最終效果
每次你 git commit 前,Git 會:
- 讀取
README.md - 在前面加上 Jekyll 的 front matter
- 輸出成
index.md給 GitHub Pages 使用
🔧 教學步驟:建立 Git pre-commit hook
📁 步驟 1:建立 .git/hooks/pre-commit 檔案(或修改它)
- Note: 從檔案總管找到pro-commit檔案,又鍵用vs code打開。
- Note:
pre-commit要設為LF檔,而不是CRLF。可以在vscode右下角設定。
在你的 repo 根目錄中,打開 terminal:
cd pages-med-utils/.git/hooks
nano pre-commit
或你可以用 VS Code/任何編輯器。
📝 步驟 2:貼上以下腳本內容
#!/bin/bash

# 這是 pre-commit hook,自動從 README.md 生成 index.md(含 Jekyll front matter)

echo "---" > index.md
echo "layout: default" >> index.md
echo "title: Home" >> index.md
echo "---" >> index.md
echo "" >> index.md

cat README.md >> index.md

echo "[pre-commit] index.md has been updated from README.md"
🔁 你可以根據實際需要修改 layout 或其他 front matter。
📛 步驟 3:賦予這個檔案執行權限
- 可以跳過這一步驟,直接用下一步驟測試是否ok。
chmod +x .git/hooks/pre-commit - 用這個步驟測試 ```bash bash .git/hooks/pre-commit [pre-commit] index.md has been updated from README.md —
🧪 步驟 4:測試一下!
- 編輯
README.md - 執行:
git add .
git commit -m "Update README"
你會看到:
[pre-commit] index.md has been updated from README.md
然後 index.md 也自動更新啦 🎉
🔄 額外升級(可選)
如果你要讓這段 hook 能跨機使用或分享給其他人,也可以放到 .githooks/pre-commit 並設一個 core.hooksPath:
mkdir .githooks
mv .git/hooks/pre-commit .githooks/pre-commit
git config core.hooksPath .githooks
Step 2: 讓 markdown 檔案可以顯示在網頁上
簡易版本
- 在 markdown 檔案最上方加上
---
layout: default
title: Home
---
Step 3: 插入圖片
方法二:用 site.url 和 site.baseurl(比較通用)
.md 或 HTML 裡寫上絕對路徑:
Step 4: 進階設定
1. 新增 RSS 訂閱功能透過加入 jekyll-feed 插件,讓讀者能訂閱你的部落格,獲得最新文章通知
設定方法:
在 _config.yml 中加入:
plugins:
  - jekyll-feed
2. 啟用文章分類與標籤使用 jekyll-archives 插件,將文章依照分類或標籤整理,方便讀者瀏覽特定主題的內容
設定方法:
在 _config.yml 中加入:
plugins:
  - jekyll-archives
3. 新增搜尋功能導入如 Lunr.js 的搜尋功能,讓讀者能快速找到感興趣的文章
4. 建立「關於我」頁面提供一個「關於我」頁面,介紹你的背景、專業領域或部落格的宗旨,增加讀者的信任感
📈 SEO 與社群分享優化
5. *完善 SEO 設定
使用 jekyll-seo-tag 插件,自動生成適當的 meta 標籤,提升搜尋引擎的收錄效。
設定方法:
在 _config.yml 中加入:
plugins:
  - jekyll-seo-tag
並在你的佈局檔案(如 _layouts/default.html)的 <head> 區塊中加:
<!-- Begin Jekyll SEO tag v2.8.0 -->
<title>Github Pages | Pages_Blog</title>
<meta name="generator" content="Jekyll v3.10.0" />
<meta property="og:title" content="Github Pages" />
<meta property="og:locale" content="en_US" />
<link rel="canonical" href="https://liuian.github.io/Pages_Blog/en/tools/github_pages.html" />
<meta property="og:url" content="https://liuian.github.io/Pages_Blog/en/tools/github_pages.html" />
<meta property="og:site_name" content="Pages_Blog" />
<meta property="og:type" content="website" />
<meta name="twitter:card" content="summary" />
<meta property="twitter:title" content="Github Pages" />
<script type="application/ld+json">
{"@context":"https://schema.org","@type":"WebPage","headline":"Github Pages","url":"https://liuian.github.io/Pages_Blog/en/tools/github_pages.html"}</script>
<!-- End Jekyll SEO tag -->
6. *新增網站地圖
透過 jekyll-sitemap 插件,自動生成 sitemap.xml,幫助搜尋引擎更有效地索引你的網。
設定方法:
在 _config.yml 中加入:
plugins:
  - jekyll-sitemap
7. *整合社群分享功能
加入社群分享按鈕,讓讀者能輕鬆分享文章至 Facebook、Twitter 等平台,擴大曝光。
🎨 使用者體驗與設計建議
8. *優化行動裝置顯示
確保網站在手機和平板上也有良好的顯示效果。你可以使用 Google 的行動裝置友好測試工具 來檢查並化。
9. *自訂網站風格
透過修改 assets/css/style.scss,自訂網站的配色、字體等風格,讓部落格更具個人色。
📊 進階功能建議
10. 整合網站分析工
使用 Google Analytics 或其他分析工具,了解讀者的瀏覽行為,進一步優化內容佈局。
11. 啟用留言功
透過整合 Disqus 等第三方服務,讓讀者能在文章下方留言,增加動性。
Step 5: 外觀 (加入側邊欄, 程式碼區塊方框)
5.1 加入側邊欄
所有頁面都自動帶有 可折疊的目錄欄(TOC),需要 修改 _layouts/default.html,把 TOC 整合進每一頁的主架構。
5.1.0 最終資料夾結構
IanBlog/
├── _layouts/
│   └── default.html               ← 加入 TOC 結構的主模板
├── assets/
│   ├── css/
│   │   └── style.scss            ← 高亮 TOC 的 CSS
│   ├── js/
│   |   └── main.js               ← tocbot 的初始化腳本
|   └── images/
│
├── index.md                      ← 首頁(含目錄導引)
├── README.md                     ← GitHub repo 說明(可選)
│
├── {文章資料夾1}/
│   └── {文章1}.md
├── {文章資料夾2}/
│   ├── {文章2}.md
└── {文章資料夾3}/
    └── {文章3}.md
5.1.1 新增 _layouts/default.html
這邊是一個 簡潔、通用的 layout 結構,可以讓 TOC 固定在左側、內容在右側,自動作用於所有頁面:
<!DOCTYPE html>
<html lang="en">
<head>
<meta charset="UTF-8">
<title>Github Pages</title>
<meta name="viewport" content="width=device-width, initial-scale=1">
<link rel="stylesheet" href="/Pages_Blog/assets/css/style.css">
<link rel="stylesheet" href="https://cdn.jsdelivr.net/npm/tocbot@4.20.1/dist/tocbot.css">
<!-- Begin Jekyll SEO tag v2.8.0 -->
<title>Github Pages | Pages_Blog</title>
<meta name="generator" content="Jekyll v3.10.0" />
<meta property="og:title" content="Github Pages" />
<meta property="og:locale" content="en_US" />
<link rel="canonical" href="https://liuian.github.io/Pages_Blog/en/tools/github_pages.html" />
<meta property="og:url" content="https://liuian.github.io/Pages_Blog/en/tools/github_pages.html" />
<meta property="og:site_name" content="Pages_Blog" />
<meta property="og:type" content="website" />
<meta name="twitter:card" content="summary" />
<meta property="twitter:title" content="Github Pages" />
<script type="application/ld+json">
{"@context":"https://schema.org","@type":"WebPage","headline":"Github Pages","url":"https://liuian.github.io/Pages_Blog/en/tools/github_pages.html"}</script>
<!-- End Jekyll SEO tag -->
<!-- 如果有 jekyll-seo-tag -->
</head>
<body>
<div style="display: flex; max-width: 1200px; margin: 0 auto; padding: 1rem;">
<nav class="js-toc" style="width: 250px; margin-right: 2rem; position: sticky; top: 1rem;"></nav>
<div class="js-toc-content" style="flex: 1;">
<h2 id="local-repo-connect-to-a-remote-repository">Local Repo Connect to a Remote Repository</h2>
<ul>
<li><code class="language-plaintext highlighter-rouge">git init</code></li>
<li><code class="language-plaintext highlighter-rouge">git remote add origin <liink.git></code></li>
<li><code class="language-plaintext highlighter-rouge">git remote -v</code></li>
</ul>
<h2 id="gitignore">.gitignore</h2>
<ul>
<li>(wins) <code class="language-plaintext highlighter-rouge">New-Item -Path . -Name ".gitignore" -ItemType "File" -Force</code></li>
<li>(linux) <code class="language-plaintext highlighter-rouge">nano .gitignore</code></li>
</ul>
<div class="language-bash highlighter-rouge"><div class="highlight"><pre class="highlight"><code><span class="c"># .gitignore</span>
<span class="k">*</span>.tsv
<span class="k">*</span>.geojson
</code></pre></div></div>
<h2 id="add-commit-push">add, commit, push</h2>
<ul>
<li><code class="language-plaintext highlighter-rouge">git add .</code></li>
<li><code class="language-plaintext highlighter-rouge">git commit -m '<message>'</code></li>
<li>first push. Check current branch name: <code class="language-plaintext highlighter-rouge">git branch</code></li>
<li>first push: <code class="language-plaintext highlighter-rouge">git push -u origin [branch name]</code></li>
<li><code class="language-plaintext highlighter-rouge">git push</code></li>
</ul>
<h2 id="branch">branch</h2>
<ul>
<li>check current branch name: <code class="language-plaintext highlighter-rouge">git branch</code></li>
<li>rename current branch locally: <code class="language-plaintext highlighter-rouge">git branch -M pu_building</code></li>
<li>delete old branch: <code class="language-plaintext highlighter-rouge">git push origin --delete master</code></li>
<li>verify everthing: <code class="language-plaintext highlighter-rouge">git branch -a</code></li>
</ul>
<h2 id="force-pull-from-a-git-remote-repository--discard-all-local-changes">Force pull from a Git remote repository & discard all local changes</h2>
<p>To <strong>force pull from a Git remote repository</strong> and <strong>discard all local changes</strong>, follow these steps carefully. This will overwrite your local files and history with the latest from the remote, <strong>so make sure you’re okay with losing any uncommitted local work</strong>.</p>
<hr />
<h3 id="-warning">🚨 WARNING:</h3>
<p>This process will <strong>delete all local changes</strong>, including uncommitted and committed but not pushed changes.</p>
<hr />
<h2 id="-steps-to-force-pull-and-recover-remote-repository">✅ Steps to Force Pull and Recover Remote Repository:</h2>
<h3 id="1-discard-uncommitted-changes-optional-but-recommended-if-youre-unsure"><strong>1. Discard uncommitted changes (optional but recommended if you’re unsure):</strong></h3>
<div class="language-bash highlighter-rouge"><div class="highlight"><pre class="highlight"><code>git reset <span class="nt">--hard</span>
git clean <span class="nt">-fd</span>
</code></pre></div></div>
<ul>
<li><code class="language-plaintext highlighter-rouge">reset --hard</code>: resets tracked files to the last commit</li>
<li><code class="language-plaintext highlighter-rouge">clean -fd</code>: removes untracked files and directories</li>
</ul>
<hr />
<h3 id="2-fetch-latest-remote-data"><strong>2. Fetch latest remote data:</strong></h3>
<div class="language-bash highlighter-rouge"><div class="highlight"><pre class="highlight"><code>git fetch <span class="nt">--all</span>
</code></pre></div></div>
</div>
</div>
<script src="https://cdn.jsdelivr.net/npm/tocbot@4.20.1/dist/tocbot.min.js"></script> <!-- TOC Script -->
<script src="/Pages_Blog/assets/js/main.js"></script> <!-- custom script -->
</body>
</html>
Note:
<head>: 用來定義網頁的元數據,設置頁面標題、字符編碼、樣式、SEO 信息等,這些對頁面本身不可見,但對頁面的加載和優化非常重要。<body>: 包含頁面的實際內容,這些內容會顯示在用戶的瀏覽器中。它包括頁面文本、圖片、導航欄、主內容等。
5.1.2 新增 assets/css/style.scss
這樣可以讓目前閱讀區塊的目錄高亮顯示:
.is-active-link {
  font-weight: bold;
  color: #1a73e8;
}
5.1.3 新增 assets/js/main.js
tocbot.init({
  tocSelector: '.js-toc',
  contentSelector: '.js-toc-content',
  headingSelector: 'h1, h2, h3, h4, h5, h6',
  collapseDepth: 6,
  scrollSmooth: true,
  orderedList: false,
});
5.1.4 最後檢查一下每個 .md 頁面都要有:
---
layout: default
title: 任意標題
---
這樣才能套用我們剛剛改的 default.html!
5.2 解決插入sidebar後圖片變超大
- 現象:
- 原因: 沒有限制圖片寬度
- 解法: 在
assets/css/style.scss加入以下這段
img {
    max-width: 100%;
    height: auto;
    display: block;
    margin: 1rem auto;
}
5.3 加入區塊程式碼方框(markdown)
/* Style for code blocks (surrounded by triple backticks ```) */
pre {
  background: #f5f5f5;       /* Light gray background */
  border: 1px solid #ccc;    /* Gray border */
  border-radius: 6px;
  padding: 1rem;
  overflow-x: auto;          /* Enable horizontal scroll for overflow */
  font-family: Consolas, Monaco, 'Courier New', monospace;
  font-size: 0.95rem;
  line-height: 1.5;
}

/* Additional styling for code content */
code {
  font-family: Consolas, Monaco, 'Courier New', monospace;
  font-size: 0.95rem;
  color: #333;
}

/* Inline code styling (e.g. `example`) */
p code, li code {
  background-color: #eee;
  padding: 0.2em 0.4em;
  border-radius: 3px;
  font-size: 0.9em;
}
5.4 使的側邊欄可收合
要讓你的 TOC 側邊欄可收合(可展開 / 收起),我們可以加上一些簡單的 JavaScript 搭配 CSS 切換 class,以下是完整解法:
✅ 修改後的內容包括:
- 為側邊欄加上 切換按鈕
- 增加
.collapsedclass 的 CSS 控制樣式 - 加入 JavaScript 處理「收合 / 展開」行為
5.4.1 修改 default.html
在 <nav class="sidebar js-toc"> 外面包一個容器,加上一個按鈕:
<!-- TOC 導覽欄容器 -->
<div class="sidebar-wrapper">
  <button id="toggle-sidebar">☰ Table of Contents</button>
  <nav class="sidebar js-toc"></nav>
</div>
main.js 改為:
<script>
  // 初始化 TOCBOT
  tocbot.init({
    tocSelector: '.js-toc',
    contentSelector: '.js-toc-content',
    headingSelector: 'h1, h2, h3, h4, h5, h6',
    collapseDepth: 6,
    scrollSmooth: true,
    orderedList: false,
  });

  // 切換側邊欄顯示 / 隱藏
  document.getElementById('toggle-sidebar').addEventListener('click', function () {
    document.querySelector('.sidebar').classList.toggle('collapsed');
  });
</script>
🎨 修改 style.css
/* 包住 sidebar 與切換按鈕的外框 */
.sidebar-wrapper {
    display: flex;
    flex-direction: column;
    margin-right: 2rem;
    position: sticky;
    top: 1rem;
    align-self: flex-start;
}

/* 收合狀態下隱藏 TOC */
.sidebar.collapsed {
    display: none;
}

/* TOC 切換按鈕 */
#toggle-sidebar {
    background: #eee;
    border: 1px solid #ccc;
    padding: 0.5rem 1rem;
    margin-bottom: 0.5rem;
    border-radius: 4px;
    cursor: pointer;
    font-size: 1rem;
    text-align: left;
}

@media (max-width: 768px) {
    #toggle-sidebar {
    width: 100%;
    }
}
5.5 處理手機板TOC排版
-
For example:
-
將style.css
@media部分改為
/* Responsive */
@media (max-width: 768px) {
    .container {
        flex-direction: column;
        padding: 0.5rem;
    }

    .sidebar-wrapper {
        width: 100%;
        margin-right: 0;
        position: relative;
    }

    .sidebar {
        width: 100%;
        max-height: 60vh;
        overflow-y: auto;
        background: #fff;
        border: 1px solid #ccc;
        border-radius: 6px;
        box-shadow: 0 2px 6px rgba(0,0,0,0.1);
        margin-bottom: 1rem;
        padding: 1rem;
        z-index: 1;
    }

    .sidebar.collapsed {
        max-height: 0;
        overflow: hidden;
        padding: 0;
        border: none;
        box-shadow: none;
    }

    #toggle-sidebar {
        width: 100%;
        margin-bottom: 0.5rem;
        position: relative;
        z-index: 2;
        background: #f9f9f9;
        font-weight: bold;
    }

    .content {
        z-index: 0;
        position: relative;
    }
}
5.6 程式碼高亮
- 新增
assets/rouge.css - 貼上 https://raw.githubusercontent.com/jwarby/jekyll-pygments-themes/master/github.css 內容
- 加入到
_layouts/default.html<body> 部分
<script src="/Pages_Blog/assets/js/main.js"></script> <!-- custom script -->
5.7 加入 back to home & jump to top
style.css加入
/* Back to home 連結 */
.back-home-link {
    position: fixed;
    bottom: 2rem;
    left: 1.5rem;
    background: #f0f0f0;
    color: #333;
    padding: 0.5rem 1rem;
    text-decoration: none;
    border: 1px solid #ccc;
    border-radius: 4px;
    z-index: 999;
    font-size: 0.9rem;
}


/* TOC 切換按鈕 */
#toggle-sidebar {
    background: #eee;
    border: 1px solid #ccc;
    padding: 0.5rem 1rem;
    margin-bottom: 0.5rem;
    border-radius: 4px;
    cursor: pointer;
    font-size: 1rem;
    text-align: left;
}
main.js改為
document.addEventListener("DOMContentLoaded", function () {
    // 初始化 tocbot
    tocbot.init({
        tocSelector: '.js-toc',
        contentSelector: '.js-toc-content',
        headingSelector: 'h1, h2, h3, h4, h5, h6',
        hasInnerContainers: true,
        collapseDepth: 6,
        scrollSmooth: true,
        orderedList: false,
    });

    // 切換 TOC 側邊欄顯示
    const toggleButton = document.getElementById("toggle-sidebar");
    const sidebar = document.querySelector(".sidebar");

    toggleButton.addEventListener("click", function () {
        sidebar.classList.toggle("collapsed");
    });

    // Jump to top 功能
    const toTopBtn = document.createElement("button");
    toTopBtn.textContent = "↑ Top";
    toTopBtn.className = "jump-top-btn";
    document.body.appendChild(toTopBtn);

    toTopBtn.addEventListener("click", function () {
        window.scrollTo({ top: 0, behavior: "smooth" });
    });

    // Back to home 功能(只有在不是首頁時顯示)
    if (window.location.pathname !== "/Pages_Blog/" && window.location.pathname !== "/Pages_Blog/index.html") {
        const backHomeLink = document.createElement("a");
        backHomeLink.textContent = "← Home";
        backHomeLink.href = "https://liuian.github.io/Pages_Blog/";
        backHomeLink.className = "back-home-link";
        document.body.appendChild(backHomeLink);
    }
    // 捲動到一定高度後顯示「Top」按鈕
    window.addEventListener("scroll", function () {
        if (window.scrollY > 300) {
            toTopBtn.style.display = "block";
        } else {
            toTopBtn.style.display = "none";
        }
    });
});
5.8 加入navbar
5.8.1 assets/css/style.css 加入
.navbar {
    display: flex;
    justify-content: center;  /* 中置連結群 */
    flex-wrap: wrap;          /* 可自動換行 */
    position: fixed;
    top: 0;
    left: 0;
    width: 100%;
    background: #fff;
    border-bottom: 1px solid #ddd;
    padding: 0.5rem 1.5rem;
    z-index: 1000;
    font-family: "Segoe UI", sans-serif;
}

.nav-links {
    display: flex;
    flex-wrap: wrap;
    justify-content: center;
}

.nav-links a {
    margin: 0 0.5rem;
    white-space: nowrap; /* 防止換行 */
}

.nav-links a:hover {
    color: #007acc;
}
5.8.2 _layouts/default.html body 部分加入
<nav class="navbar">
    <div class="nav-links">
        <a href="https://liuian.github.io/Pages_Blog/">Home</a>
        <a href="https://liuian.github.io/Pages_Blog/tools/">Tools</a>
        <a href="https://liuian.github.io/Pages_Blog/notes/">Notes</a>
        <a href="https://liuian.github.io/Pages_Blog/blog/">Blog</a>
        <a href="https://liuian.github.io/Pages_Blog/about/">About</a>
    </div>
</nav>
5.8 TOC 客製化自動捲動方式
TODO
Note - debug
如果 deployment 卡住
- 強制重新deploy
git commit --amend --no-edit
git push origin main --force
所有事項checklist
已完成
- 主頁
- commit 連結 gtihub readme.md & web index.md -
.githooks/pre-commit - 主頁文章列可收合/展開
- commit 連結 gtihub readme.md & web index.md -
- Table of contents
- (tocbot.css)
- 左側list
- 展開/收合 按鈕
- home/tools/blogs/notes/about 按鈕
- 中英文切換 (切換button, 換語言時換到對應的頁面, image路徑)
- 外觀
- 主視覺顏色
- 行距
- 字體
- icon - (rouge.css)
- jump to top button
TODO
- Table of contents 可自由滑動
- 手機板瀏覽
亮暗色系切換